Composting at Home: Reduce Waste and Nourish Your Garden
Turn kitchen scraps and yard waste into nutrient-rich soil. Learn how to easily start composting at home and help your garden thrive!
Table of Contents
- Introduction
- Why Compost at Home?
- Understanding the Composting Process
- Choosing Your Composting Method
- The Perfect Recipe: Browns and Greens
- What to Keep Out of Your Pile
- Setting Up Your Compost System
- Maintaining Your Compost Pile
- Knowing When It's Ready
- Using Your "Black Gold"
- Troubleshooting Common Issues
- Composting in Small Spaces
- Conclusion
- FAQs
Introduction
Ever feel a pang of guilt tossing food scraps into the trash? You're not alone. Americans send a staggering amount of food waste to landfills each year, contributing to greenhouse gas emissions as it decomposes without oxygen. But what if there was a simple, incredibly rewarding way to intercept that waste stream right in your own backyard (or even on your balcony)? Enter composting at home.
Composting isn't just some trendy buzzword for eco-warriors; it's a powerful, natural process that transforms organic materials – things like vegetable peelings, coffee grounds, and leaves – into a dark, crumbly, nutrient-rich soil amendment often called "black gold." It's essentially recycling nature's way, closing the loop on your organic waste and providing invaluable benefits to your garden. Ready to turn your kitchen scraps into garden treasure? Let's dive in.
Why Compost at Home?
Why bother with composting? The reasons are numerous and compelling, touching on everything from environmental stewardship to saving money and improving your soil's health. Think about it: every banana peel, apple core, and grass clipping you compost is one less thing heading to the landfill. This directly reduces methane gas production, a potent greenhouse gas, which is a pretty significant win for the planet.
Beyond the environmental impact, the benefits to your garden are immense. Compost isn't just fertilizer; it's a soil builder. It improves soil structure, helping sandy soils retain water and nutrients while loosening heavy clay soils for better drainage and root growth. It introduces beneficial microorganisms and earthworms, creating a living, thriving soil ecosystem. This leads to healthier, more resilient plants that need less synthetic fertilizer and less frequent watering. Plus, who doesn't love the idea of creating something so valuable from waste?
Understanding the Composting Process
At its heart, composting is a controlled decomposition process driven by microbes – bacteria, fungi, and other tiny organisms. These diligent workers break down organic matter, transforming complex materials into simpler, stable compounds. It's a bit like throwing a party for trillions of invisible helpers!
For these microbes to do their best work, they need a few things: air, moisture, and the right food source, which is a mix of carbon-rich materials (the "browns") and nitrogen-rich materials (the "greens"). When these elements are in balance, the microbes flourish, and the process happens efficiently, often generating heat. This heat can even kill weed seeds and pathogens, which is a great bonus. Understanding this basic recipe is key to successful composting at home.
Choosing Your Composting Method
Okay, you're convinced! But where do you start? The good news is there's no single "right" way to compost. Your choice often depends on factors like the space you have available, how much organic waste you generate, and how hands-on you want to be. From simple piles to sophisticated bins, there's a system for almost everyone.
Traditional compost piles or bins are perhaps the most common. They can be as simple as a designated spot in the yard or a structure built from pallets, wire mesh, or purchased plastic bins. Tumbler composters are another popular choice, especially for those who prefer a neater look or find turning a pile difficult. For smaller spaces or those generating mostly kitchen scraps, vermicomposting (composting with worms) or using systems like Bokashi buckets might be ideal. Consider your lifestyle and space when making your decision; the best method is the one you'll actually use!
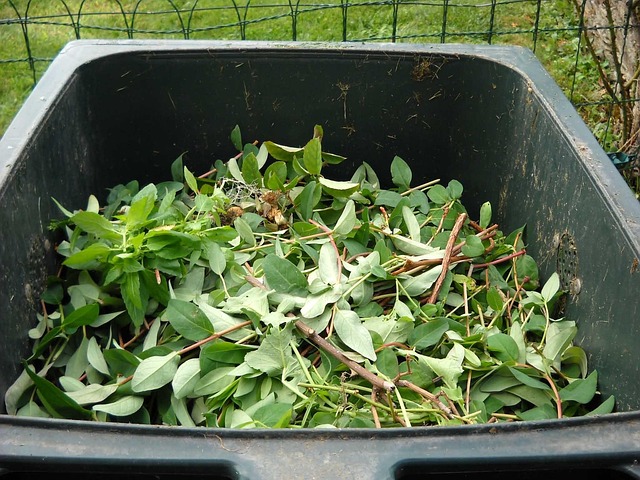
The Perfect Recipe: Browns and Greens
Think of composting as cooking – you need the right ingredients in the right proportions. In the composting world, these ingredients are broadly categorized as "Browns" and "Greens." Getting the ratio right is crucial for the microbes to work efficiently. Too many greens can lead to a smelly, slimy mess, while too many browns will make the process slow to a crawl.
Browns are carbon-rich materials. They provide energy for the microbes and help create the airy structure of the compost pile. Greens are nitrogen-rich materials. They provide the protein and nutrients microbes need to reproduce and do the heavy lifting of breaking down materials. A general rule of thumb is to aim for a mix that is roughly 2-3 parts browns to 1 part greens by volume, although it's not an exact science and you'll learn to eyeball it over time based on how your pile behaves.
- Browns (Carbon Sources): Include dried leaves, shredded newspaper (avoid glossy paper), cardboard (torn into small pieces), straw, sawdust, and wood chips.
- Greens (Nitrogen Sources): Include fruit and vegetable scraps, coffee grounds, tea bags, grass clippings, garden trimmings (non-woody), and eggshells.
- Balance is Key: Layering materials or mixing them well helps ensure the browns and greens are properly distributed throughout the pile for optimal decomposition.
What to Keep Out of Your Pile
While composting is forgiving, there are definitely a few things you should avoid adding to your home compost pile. Including these items can lead to unpleasant odors, attract pests, or introduce pathogens that you don't want in your garden soil. Avoiding contaminants is essential for producing healthy, usable compost.
Materials like meat, bones, dairy products, and oily foods should be avoided in typical backyard composting. They decompose slowly, can attract rodents and flies, and may harbor harmful bacteria. Pet waste (from dogs or cats) can contain pathogens that aren't reliably killed in standard home composting temperatures. Diseased or pest-infested plants should also be excluded, as the disease or pests might survive the process and spread in your garden. Lastly, avoid adding chemically treated wood, coal ash, or synthetic materials like plastic or metal, which won't break down.
Setting Up Your Compost System
Ready to get started? Setting up your compost system is usually straightforward. First, choose a location. An ideal spot is one that's easily accessible, relatively level, and gets some sun (which helps with heating) but isn't completely exposed (which can dry it out). Near a water source is also handy. Consider proximity to your garden and kitchen for ease of adding materials and using the finished product.
Whether you're building a simple bin or placing a purchased one, ensure there's good contact with the ground. This allows beneficial microbes and critters like earthworms to colonize your pile. Start adding your materials, alternating layers of browns and greens if you like, or simply mixing them as you add them. Chopping larger items into smaller pieces will significantly speed up the decomposition process. Don't forget to add a little water if materials seem dry, as moisture is essential!
Maintaining Your Compost Pile
Once your compost pile is set up, it's not just a "set it and forget it" operation, though it doesn't require constant attention either. Think of yourself as the pile's friendly landlord, checking in occasionally to ensure the conditions are right for your microbial tenants. Two critical factors are moisture and aeration.
Your compost pile should feel consistently damp, like a wrung-out sponge. If it's too dry, decomposition slows down. If it's too wet, it can become anaerobic (lacking oxygen), leading to foul odors. Adding water or dry browns can fix moisture issues. Aeration involves turning or mixing the pile periodically. This introduces oxygen, which the aerobic microbes need to thrive, and helps distribute moisture and nutrients. Turning also helps the pile heat up, speeding decomposition. How often you turn depends on how quickly you want compost – weekly turning accelerates the process, while less frequent turning (monthly) is fine if you're patient.
Knowing When It's Ready
Patience is a virtue in composting, but how do you know when your brown and green ingredients have transformed into that glorious "black gold"? The time it takes can vary greatly depending on the materials you added, the size of your pile, and how actively you've managed it (turning, moisture). It could be anywhere from a few months to a year or more. But thankfully, there are clear signs to look for.
Finished compost should have a dark, rich brown or black color and a crumbly texture. Most importantly, it should smell like fresh earth, not like rotting garbage. You should no longer be able to identify the original materials that went into the pile, though you might see some small twigs or other woody bits that take longer to break down. These larger pieces can be screened out and added back into a new batch. When it looks, feels, and smells like healthy soil, your compost is ready to nourish your garden.
Using Your "Black Gold"
Harvesting your finished compost is incredibly satisfying – the culmination of turning potential waste into a valuable resource! Now comes the fun part: putting that nutrient-rich goodness to work in your garden. Compost can be used in countless ways to improve soil health and boost plant growth.
One of the most common uses is as a soil amendment. Simply mix or lightly till an inch or two of compost into your garden beds before planting. It improves soil structure, adds nutrients, and helps retain moisture. Compost can also be used as a top dressing around existing plants; simply spread a layer around the base of your plants, keeping it a little away from the stems. You can also use it when potting up containers or starting seeds, although for seed starting, it's often mixed with other materials for better drainage and aeration. Don't be shy – your plants will thank you!
Troubleshooting Common Issues
Even with the best intentions, you might encounter a hiccup or two on your composting journey. Don't worry, most common issues are easily fixed and are part of the learning process. Smells, pests, or a pile that just isn't breaking down are typical concerns, but they usually point to an imbalance in the composting ingredients or conditions.
- Foul Odors (like rotten eggs): This usually indicates too much moisture and not enough oxygen (anaerobic conditions), often from too many greens or packing the pile too tightly. Add dry browns (like shredded paper or leaves), mix well, and turn the pile more frequently to introduce air.
- Attracting Pests (like flies or rodents): Often caused by adding meat, dairy, oily foods, or pet waste. Make sure these items are excluded. Covering fresh food scraps with a layer of brown material also helps deter flies. Ensure your bin is secure if rodents are a significant issue.
- Pile Isn't Heating Up or Breaking Down Slowly: This could mean the pile is too dry, lacks enough nitrogen (greens), or isn't getting enough air. Check moisture levels and add water if needed. Mix in more greens (like grass clippings or food scraps). Turn the pile to add oxygen. Chopping materials smaller can also help speed things up.
- Pile is Wet and Slimy: Too many greens and too much moisture. Add plenty of dry browns and turn thoroughly to incorporate air.
- Pile is Dry and Crumbly: Too many browns and not enough moisture. Add some greens and water, then mix well.
Composting in Small Spaces
Think you need a sprawling backyard to compost? Think again! Even if you live in an apartment with just a balcony or a small patio, you can still participate in the rewarding process of composting at home. There are numerous methods specifically designed for confined areas, proving that space doesn't have to be a barrier to reducing waste and creating valuable soil.
Vermicomposting is a fantastic option for small spaces. It uses specialized composting worms (like red wigglers) in a bin to break down food scraps. The bin can be kept indoors or outdoors in a sheltered spot. It's relatively odorless if managed correctly and produces nutrient-rich worm castings (worm poop), which are excellent for plants. Another option is using sealed systems like Bokashi bins, which use fermentation to break down food waste, including items typically avoided in traditional composting like meat and dairy. The fermented material needs to be buried or added to a regular compost pile to complete the process, but the initial breakdown happens conveniently in a sealed bucket. Don't let limited space deter you from the benefits of composting!
Conclusion
Getting started with composting at home might seem a little daunting at first, but as you can see, it's a natural process that requires just a little understanding and minimal effort for tremendous rewards. You're not just getting rid of waste; you're actively creating a valuable resource that will enrich your garden, help the environment by diverting materials from landfills, and deepen your connection to the cycles of nature. It's a practical, powerful step toward a more sustainable lifestyle.
Whether you choose a simple bin, a fancy tumbler, or a worm farm, the act of transforming scraps into soil is incredibly satisfying. So, gather those vegetable peelings, grab some leaves, and start your composting journey today. Your garden (and the planet) will certainly thank you for that nutrient-rich "black gold" you're about to create right there at home.
FAQs
Q: Can I put cooked food in my compost?
A: While small amounts of cooked plain vegetables or grains are sometimes okay, it's generally best to avoid large quantities of cooked food, especially if it contains oils, fats, or meat products, as these can attract pests and create odors in home compost bins.
Q: How long does it take to make compost?
A: The time varies significantly based on factors like the materials used, the size of the pile, temperature, moisture, and how often you turn it. It can take anywhere from 2-3 months with active management (regular turning, ideal conditions) to a year or longer for passive piles.
Q: My compost pile smells bad. What's wrong?
A: A foul smell, especially like rotten eggs or ammonia, usually means the pile is too wet and lacks oxygen (anaerobic). This often happens with too many "greens." Add dry "brown" materials like shredded leaves or paper, and turn the pile to introduce air and help it dry out slightly.
Q: Do I need a special bin to compost?
A: No, you don't absolutely *need* a special bin. You can start a compost pile directly on the ground. However, bins can help contain the pile, retain heat and moisture, and look tidier, especially in smaller yards.
Q: Can I add citrus peels and onions to compost?
A: Yes, you can, but in moderation. Large quantities of citrus peels or onions can be acidic and might slow down decomposition slightly or deter earthworms if vermicomposting. Smaller amounts mixed well into the pile are generally fine.
Q: What's the difference between compost and mulch?
A: Compost is a soil amendment used to improve soil structure and fertility; it's broken-down organic matter. Mulch is typically applied *on top* of the soil surface to retain moisture, suppress weeds, and regulate soil temperature. While compost can sometimes be used *as* mulch, their primary functions differ.
Q: Can I compost pet waste?
A: It's generally advised *not* to compost dog or cat waste in standard backyard compost bins, as these can contain pathogens harmful to humans. Commercial or specially designed high-temperature composting systems are needed to safely process pet waste.